If you need to create high quality Windows Media files on the Mac and you have Flip4Mac WMV Studio Pro HD on your workstation, the process is very easy. This tutorial will show you some tricks for getting exceptional quality. This tutorial shows the process using QuickTime Pro and a DV/DVCPro video file.
Step 1. - Open a QuickTime DV/DVCPro or DV/DVCPro50 video file and choose Export from the File pull-down menu. (If you are using Final Cut Pro to export your Windows Media video file choose Export from the File Pull-down and select Using QuickTime Conversion)

Step 2. - Name your file and Choose Movie to Windows Media from the pop-up menu in the Save Exported File As dialog window.
Step 3. - Click the Options button

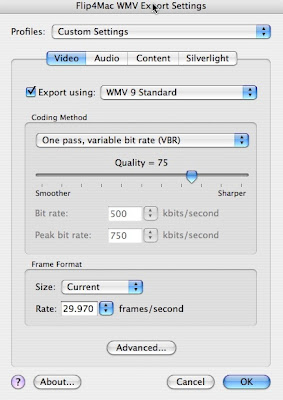
Step. 4 - When the dialog window opens Select the Video Tab and choose Windows Media Standard for your CODEC and One pass, variable bit rate (VBR). Set your Quality setting to 75. For frame rate select Current for the size and Current for the frame rate. When using the 1-pass VBR method the Bit Rate and Peak bit rate are disabled and ignored during encoding. Everything becomes quality based. The nice element about using the 1-pass VBR Quality feature is that it will guarantee that you get very good quality on your encoding because your are determining the quality setting to use. In this case a Quality setting of 75 works well.

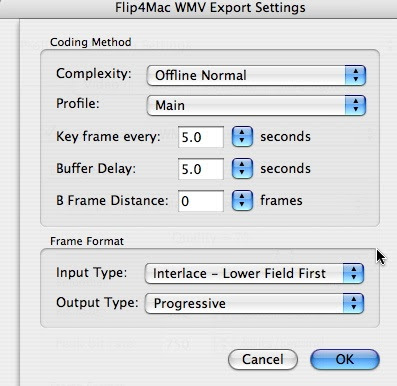
Step. 5 - Click the Advanced button in the Video tab. Now, the Advanced section is the key to getting great quality using Flip4Mac WMV Studio Pro HD. I want to point out two items in this section which are the Coding Method Complexity and the Input Type which is your field order. The Complexity determines how fast your video will be encoded. The best quality is achieved by using Offline Slow. For this tutorial you can use the Offline Normal Complexity setting which will provide great quality and not take as long as encoding with Offline Slow. If you want a faster encode and don't mind trading a little quality to achieve this use the Live Fast Complexity setting. For the Input type select the field order of your video. I know that the field order for my DV/DVCPro source is lower field so I have selected Interlace - Lower Field First for the Input Type. For Output Type select Progressive. For the other settings you can use 5 seconds for Key Frame Every, 5 seconds for Buffer Delay and 0 for B-frame distance and Main for your Profile.

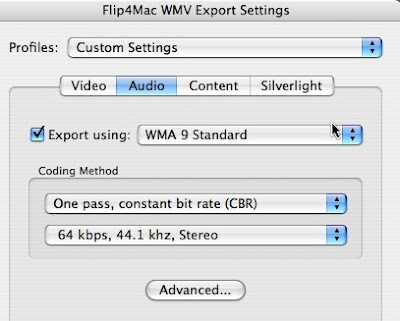
Step 6. - Click the Audio Tab and select WMA Standard for your CODEC and under Coding Method use One Pass, constant bit rate (CBR) and 64 kbps, 44.1 kHz Stereo for your audio .
Step 7. - Click the Content Tab, Add your metadata and click OK. Save your file and you're done. Your file will now start encoding.


